
Nội dung trình bày:
- Giới thiệu
- Cài đặt
- Quét hệ thống
- Kết quả quét
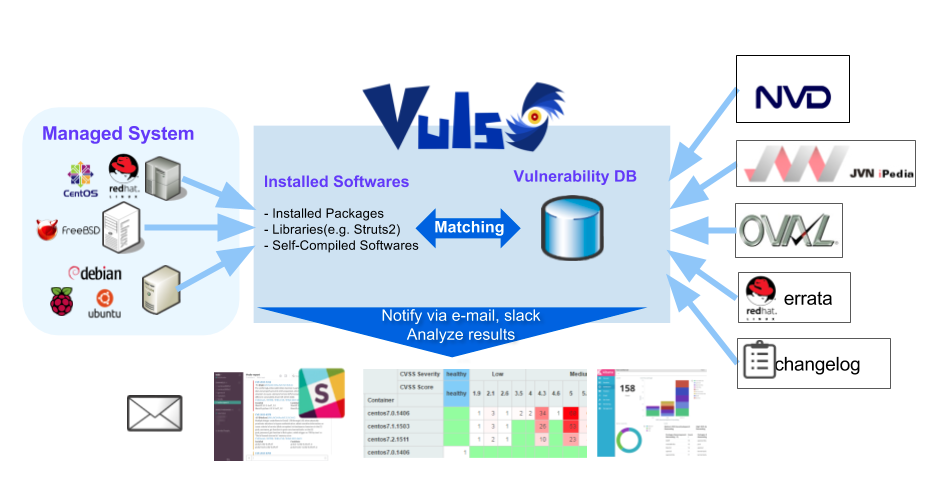
Giới thiệu
- Là công cụ mã nguồn mở, quét lỗ hổng bảo mật trên các gói phần mềm đã được cài đặt trên OS.
- Vuls quét dựa trên thông tin từ NVD, OVAL, …
- Những OS được support: Alpine, Ubuntu, Debian, RHEL, Oracle Linux, CentOS, SUSE Enterprise, …
- Kết quả quét có thể xem với Terminal Based Viewer hoặc VulsRepo (Web UI).
- Thông báo kết quả quét qua email, slack.
Cài đặt
Sau đây là các bước cài đặt trên Ubuntu
Cài đặt các yêu cầu
Package
$ sudo apt-get install sqlite git gcc make wget
$ wget https://dl.google.com/go/go1.10.2.linux-amd64.tar.gz
$ sudo tar -C /usr/local -xzf go1.10.2.linux-amd64.tar.gz
$ mkdir $HOME/go
Thêm export vào /etc/profile.d/goenv.sh
export GOROOT=/usr/local/go
export GOPATH=$HOME/go
export PATH=$PATH:$GOROOT/bin:$GOPATH/bin
Set biến môi trường ở trên vào shell hiện tại
$ source /etc/profile.d/goenv.sh
Deploy go-cve-dictionary
Build, kết quả được đặt dưới $GOPATH/bin
$ sudo mkdir /var/log/vuls
$ sudo chown user_name /var/log/vuls
$ sudo chmod 700 /var/log/vuls

$ mkdir -p $GOPATH/src/github.com/kotakanbe
$ cd $GOPATH/src/github.com/kotakanbe
$ git clone https://github.com/kotakanbe/go-cve-dictionary.git
$ cd go-cve-dictionary
$ make install
Fetch dữ liệu từ NVD
$ mkdir $HOME/vuls
$ cd $HOME/vuls
$ for i in `seq 2002 $(date +"%Y")`; do go-cve-dictionary fetchnvd -years $i; done
Deploy goval-dictionary
Build, kết quả được đặt dưới $GOPATH/bin
$ mkdir -p $GOPATH/src/github.com/kotakanbe
$ cd $GOPATH/src/github.com/kotakanbe
$ git clone https://github.com/kotakanbe/goval-dictionary.git
$ cd goval-dictionary
$ make install
Fetch dữ liệu OVAL
Phụ thuộc vào OS cần quét, chi tiết: https://github.com/kotakanbe/goval-dictionary
$ cd $HOME/vuls
$ goval-dictionary fetch-ubuntu 12 14 16 18 #Ubuntu
Deploy Vuls
$ mkdir -p $GOPATH/src/github.com/future-architect
$ cd $GOPATH/src/github.com/future-architect
$ git clone https://github.com/future-architect/vuls.git
$ cd vuls
$ make install
Quét hệ thống
Vuls hỗ trợ local scan và remote scan. Dưới đây là hướng dẫn scan localhost
$ cd $HOME/vuls
# Tạo file config.toml như sau:
[servers]
[servers.localhost]
host = "localhost"
port = "local"
Kiểm tra
Kiểm tra config.toml và setting trên server trước khi scan
$ vuls configtest
![]()
Scan
$ vuls scan
![]()
Report
$ vuls report -format-one-line-text
![]()
$ vuls report -format-short-text
$ vuls report -format-full-text | less
Kết quả quét
Terminal-Based User Interface
$ vuls tui
![]()
Web UI
VulsRepo cung cấp giao diện web để thị kết quả một cách trực quan hơn
Tạo một json report của vuls và clone vulsrepo
$ cd $HOME/vuls
$ vuls scan
$ vuls report -format-json

$ git clone https://github.com/usiusi360/vulsrepo.git
$ cd vulsrepo/server
$ cp vulsrepo-config.toml.sample vulsrepo-config.toml

# Nội dung file vulsrepo-config.toml
[Server]
rootPath = “/home/user_name/vuls/vusrepo”
resultsPath = “/home/user_name/vuls/results”
serverPort = “5111”
Start vulsrepo-server
$ ./vulsrepo-server
![]()
Một số hình ảnh của vulsrepo
![]()
![]()
![]()